Introduction to Onion Cultivation
Onions (Allium cepa) are one of the world's most important bulb vegetables. They are valued for flavor, aroma, and nutritional benefits, being rich in vitamins C and B6, antioxidants, and sulfur compounds that support heart and immune health. Onions are versatile—used fresh, cooked, pickled, or processed into powders, sauces, and seasonings.
Commercial onion farming requires careful attention to soil, climate, irrigation, fertilization, and pest management. Quality inputs and precise cultivation practices maximize bulb size, storage life, and profitability.
Onions can be grown from seeds, sets, or transplants. Seed-grown onions suit long-season climates, while sets allow quicker harvests in shorter seasons.
1. Site Selection and Climate
Onions thrive in well-drained, fertile soils with pH 6–7, preferably sandy loam or loamy soils enriched with organic matter. Avoid waterlogged fields to reduce rot and fungal diseases.
Full sun (6–8 hours/day) and moderate temperatures (15–25°C) are ideal. Onions are photoperiodic: bulb formation is triggered by day length.
Pro Tip: Day Length Matters
Choose varieties based on your latitude:
- Long-Day Varieties: Require 14–16 hours of daylight, suitable for temperate regions (Europe, US, Canada).
- Short-Day Varieties: Form bulbs with 10–12 hours of daylight, ideal for tropical regions near the equator.
- Day-Neutral Varieties: Less sensitive to day length; suitable for diverse climates.
Planting the wrong photoperiod variety results in lush leaves but no bulb formation. Always match variety to your local day-length conditions.
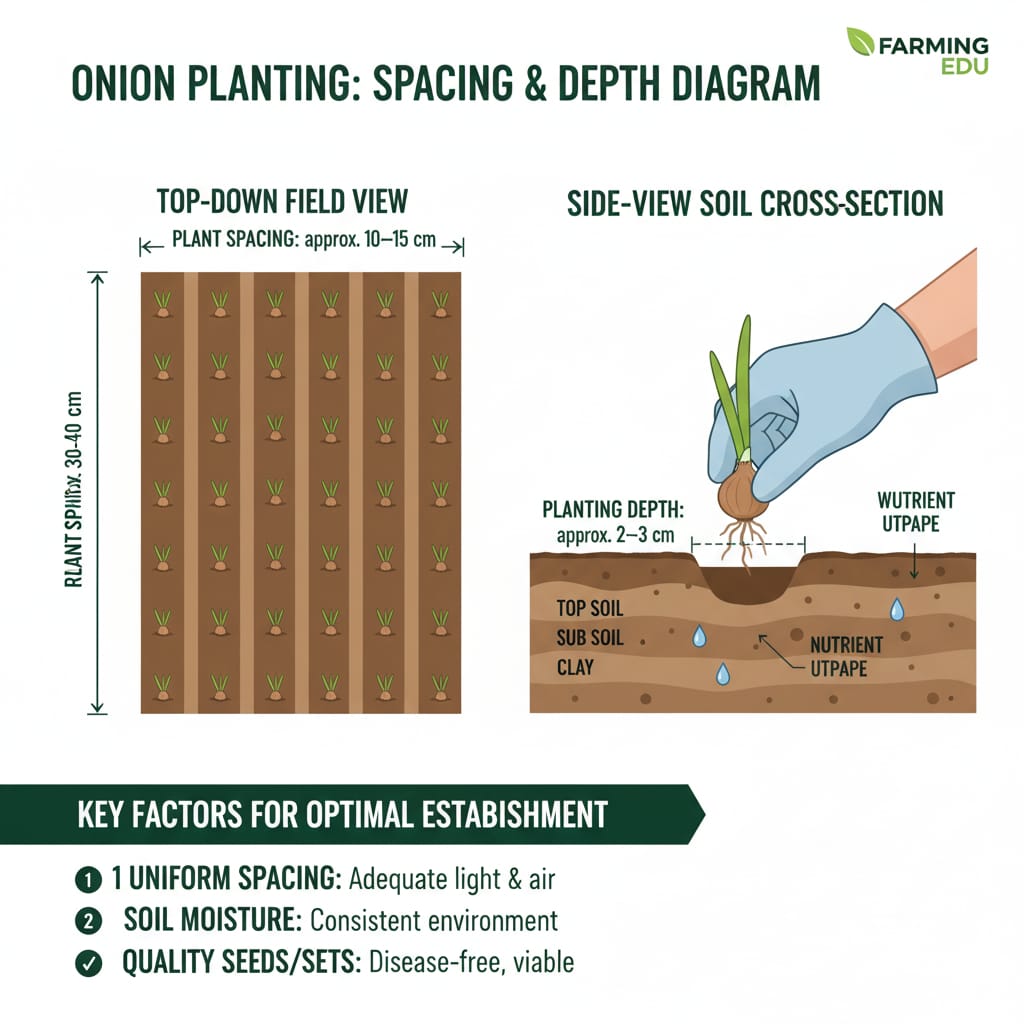
2. Land Preparation
Clear weeds and crop residues. Deep plow (20–25 cm) and harrow to create a fine seedbed. Level the field to avoid water pooling.
Incorporate well-decomposed compost or organic manure. Apply basal NPK fertilizer based on soil tests.
Raised beds or ridges improve drainage. Mulching conserves moisture, suppresses weeds, and stabilizes soil temperature.
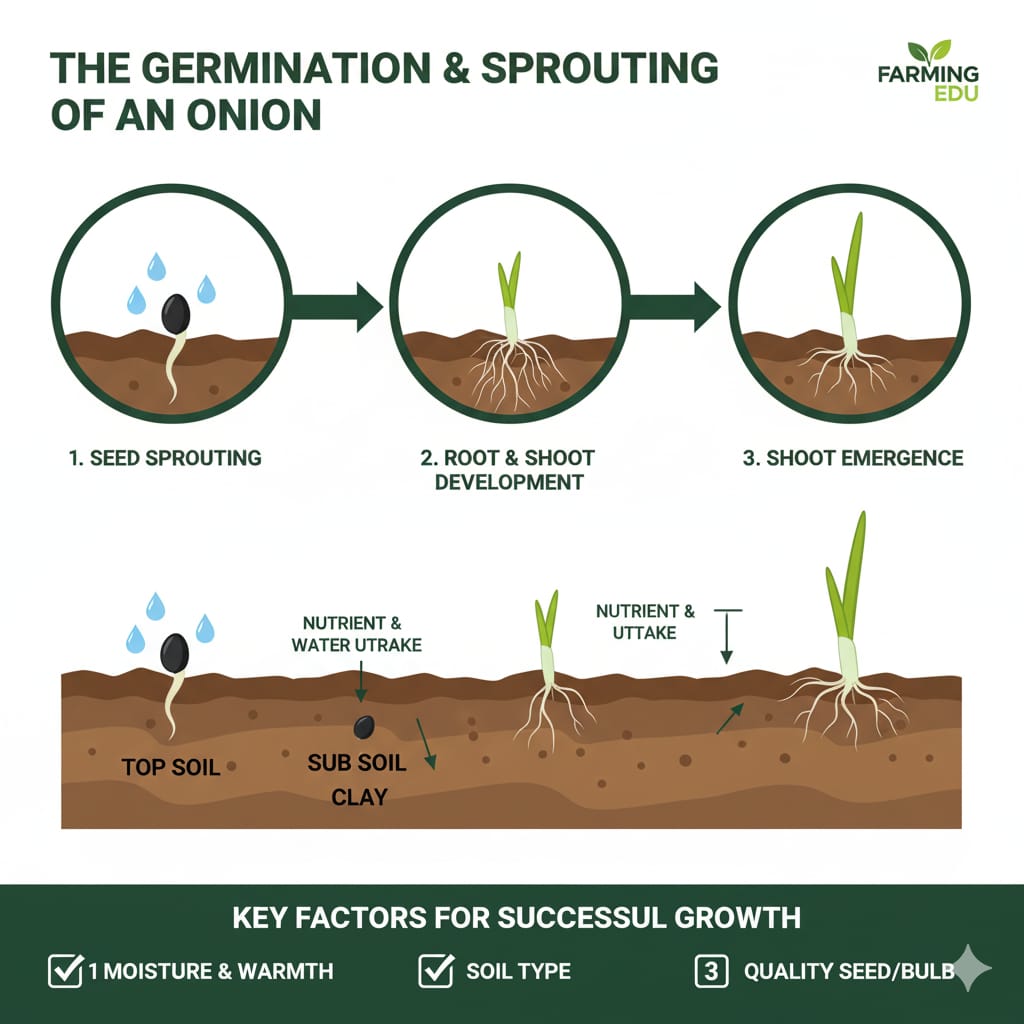
3. Seed Selection and Sowing
Use certified seeds or high-quality sets resistant to pests and diseases. Seedlings should have 4–6 true leaves before transplanting.
Sow seeds in nurseries 6–8 weeks before transplanting or direct-seed short-duration varieties. Sets should be 2–3 cm deep with 10–15 cm spacing within rows and 30–40 cm between rows.
4. Irrigation and Water Management
Onions have shallow roots and need frequent irrigation. Drip or furrow systems improve water efficiency and reduce disease risk.
Overwatering causes bulb rot; drought reduces size. Mulching retains moisture and prevents weeds.
5. Fertilization and Nutrient Management
Apply nitrogen during early growth, reducing it during bulb initiation. Phosphorus supports root development, potassium enhances bulb size, firmness, and storage.
Pro Tip: Phosphorus Banding
Instead of broadcasting phosphorus, place it 2–3 cm directly below the seed or transplant. Onions have shallow, localized roots; this ensures immediate nutrient uptake and stronger seedlings.
Include micronutrients like boron, zinc, and magnesium. Split applications or fertigation improve nutrient efficiency.
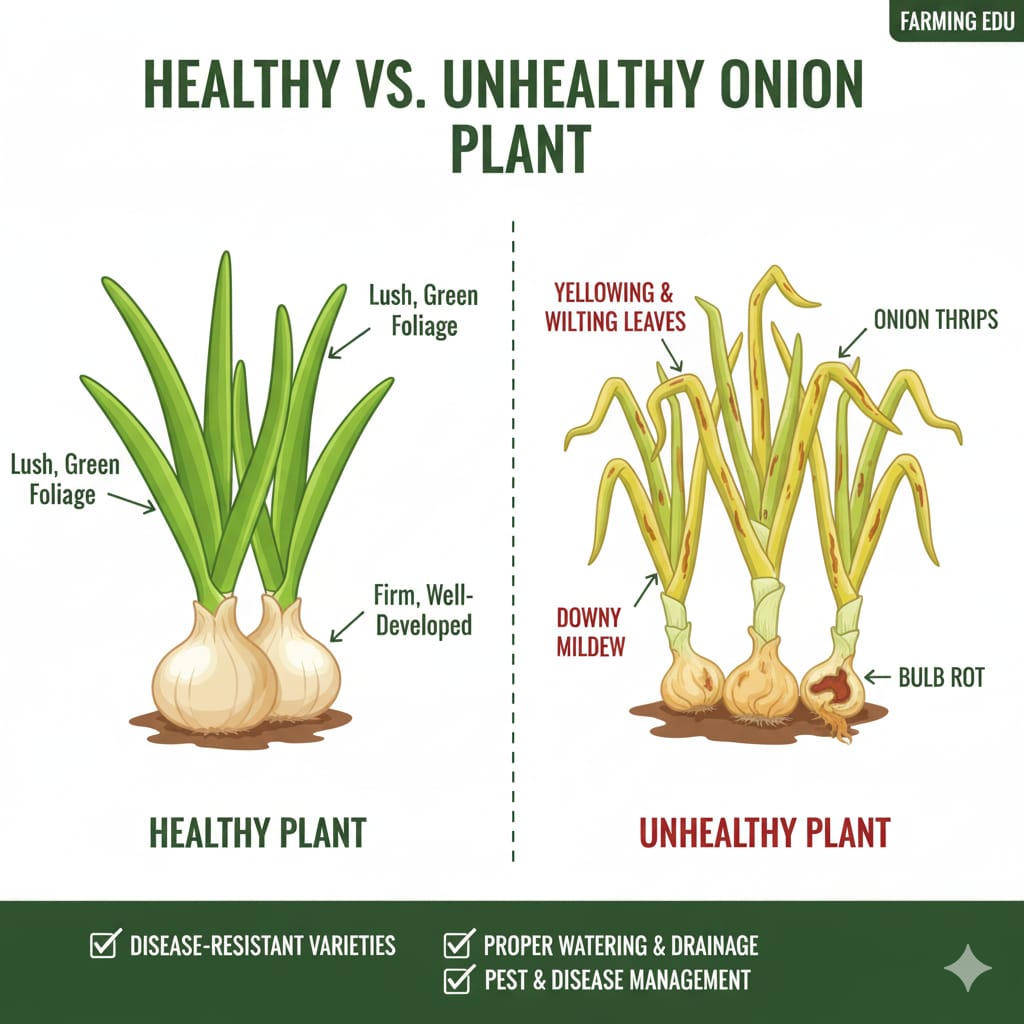
6. Pest and Disease Management
Thrips
Feed on leaves, causing silvery streaks. Use yellow sticky traps and natural predators for control.
Aphids
Transmit viral diseases. Monitor regularly and apply biopesticides as needed.
Cutworms & Stem Maggots
Attack seedlings. Use cultural controls and crop rotation.
Diseases: Downy Mildew, Purple Blotch, White Rot
Maintain proper spacing, rotate crops, and use resistant varieties.
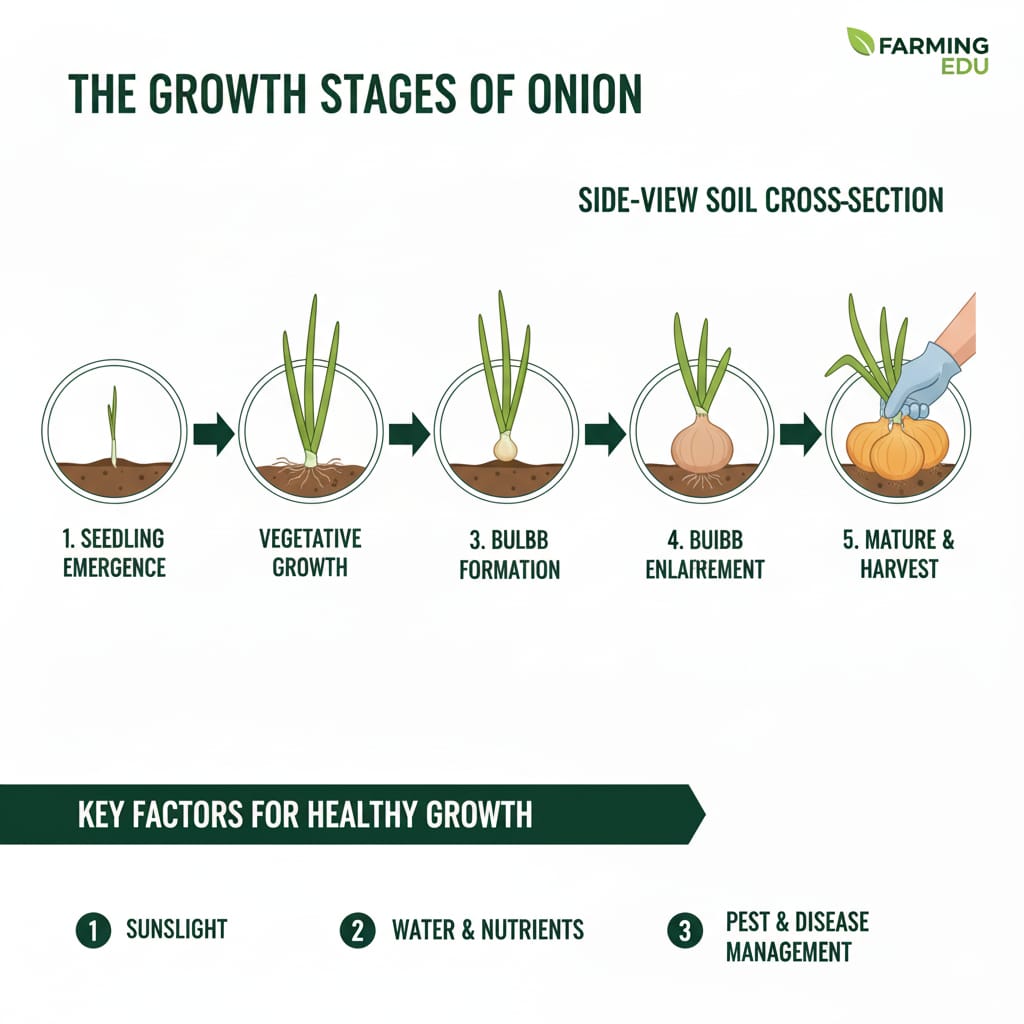
7. Harvesting
Harvest when leaves yellow and fall over. Lift bulbs carefully to avoid bruising.
Pro Tip: Neck Test for Proper Curing
Cure bulbs until the neck is tight and dry and outer scales rustle when touched. If necks remain thick and succulent, bulbs will rot within weeks.
Cure in the sun or ventilated shed for 7–10 days, then sort and grade for market.
8. Post-Harvest Handling and Storage
After curing, clean bulbs and store in cool (4–10°C), ventilated, dry conditions. Proper sorting reduces losses. Onions can be processed (sliced, dehydrated, frozen) for year-round availability.
9. Uses of Onions
- Fresh: salads, sandwiches, garnishes.
- Cooking: soups, sauces, stews, seasonings.
- Processing: dried onions, powders, paste, pickles.
- Medicinal: antioxidant, anti-inflammatory, cardiovascular support.
- Commercial: local and international markets.
Onion Growth Schedule & Management Table
| Growth Stage | Duration (Days) | Fertilization | Irrigation | Pest/Disease Monitoring | Notes |
|---|---|---|---|---|---|
| Seedling / Nursery | 0–40 | N-rich starter fertilizer; micronutrients: zinc, boron; phosphorus banded below seeds. | Keep soil moist; water lightly every 1–2 days. | Damping-off, fungal issues monitoring. | Transplant at 4–6 true leaves. |
| Early Vegetative Growth | 41–60 | Balanced NPK; split application; micronutrients as needed. | 2–3 times/week; avoid waterlogging. | Thrips, aphids monitoring. | Mulch to conserve moisture and suppress weeds. |
| Bulb Initiation | 61–90 | Reduce N, increase K; banded phosphorus optional. | Maintain consistent moisture. | Purple blotch, downy mildew monitoring. | Proper spacing; airflow critical. |
| Bulb Enlargement | 91–120 | Potassium-rich fertilizer; micronutrients optional. | Water every 3–4 days; reduce near harvest. | Stem maggots, thrips monitoring. | Begin curing; neck test critical. |
| Harvest & Post-Harvest | 120+ | No fertilizer; stop N. | Minimal irrigation; dry 1–2 days before lifting bulbs. | Sort diseased bulbs. | Cure 7–10 days; store 4–10°C, low humidity. |
Onion Images