I Pre-Planting Phase
1️⃣ Climate and Variety Selection
Wheat is a temperate crop that performs best under moderate climatic conditions. The crop requires cool temperatures during early growth and warm, dry weather during maturity. Excessive heat during flowering can significantly reduce grain yield, while heavy rainfall near harvest may cause lodging or grain sprouting. Understanding the climatic requirements of wheat is therefore essential before planting.
There are two major categories of wheat grown globally: winter wheat and spring wheat. Winter wheat is planted in autumn, remains dormant during winter, and resumes growth in spring. It generally produces higher yields because it has a longer growing period. Spring wheat, on the other hand, is planted in early spring and harvested in late summer. It is suitable for regions with harsh winters where winter wheat cannot survive.
Selecting the right variety is critical for achieving high productivity. Farmers must choose varieties adapted to their region’s rainfall patterns, temperature range, and disease pressure. Modern wheat varieties are bred for drought tolerance, pest resistance, and high yield potential. Consulting local agricultural extension services helps in selecting certified and region-specific varieties.
Additionally, choosing a variety with resistance to common wheat diseases such as rust and smut reduces dependence on chemical control. Proper variety selection reduces production risk and improves economic returns. A well-matched variety ensures better germination, stronger tillering, and uniform grain filling.
2️⃣ Soil Testing and Field Selection
Soil testing is the foundation of profitable wheat farming. Before planting, farmers should analyze soil samples to determine nutrient levels, organic matter content, and pH balance. Wheat grows best in soils with a pH range of 6.0 to 7.5. Highly acidic soils may require liming to correct pH imbalance.
Field selection is equally important. Wheat performs best in well-drained loamy soils that allow good root penetration and aeration. Waterlogged soils reduce oxygen availability in the root zone, leading to stunted growth and increased disease risk. Fields prone to flooding should be avoided unless proper drainage systems are installed.
Crop rotation plays a major role in field selection. Planting wheat after legumes such as beans or peas improves nitrogen availability naturally. Avoid planting wheat consecutively after other cereal crops, as this increases disease buildup and pest pressure. Rotational planning enhances soil fertility and breaks pest cycles.
Proper field history evaluation ensures reduced risk of soil-borne diseases. Fields with severe weed infestation or history of fungal infection may require pre-treatment. Selecting the right field ensures optimal plant establishment and long-term soil sustainability.
3️⃣ Land Preparation
Land preparation ensures that the soil provides a suitable environment for seed germination and root development. The first step involves clearing crop residues, weeds, and debris from the previous season. Removing these materials reduces pest and disease carryover.
Plowing is conducted to a depth of about 15–25 cm. This process loosens compacted soil layers, improves aeration, and enhances root penetration. Deep plowing also helps in burying weeds and exposing harmful insects to predators and sunlight.
Harrowing follows plowing and helps break large soil clods into finer particles. A fine tilth allows uniform seed placement and better seed-to-soil contact. Proper leveling ensures uniform irrigation and prevents water accumulation in low spots.
In modern agriculture, conservation tillage is becoming popular. Minimum tillage reduces soil erosion, conserves moisture, and improves soil organic matter. Regardless of method, good land preparation ensures even crop emergence and uniform growth.
II Planting Phase
4️⃣ Seed Selection
Seed quality directly influences final yield. Farmers should use certified seeds with high germination rates and genetic purity. Poor-quality seeds result in uneven plant stands and lower productivity.
Certified seeds are tested for disease, viability, and varietal purity. Using farm-saved seeds without testing increases the risk of contamination and low germination. Investing in high-quality seed often delivers better returns through higher yields.
Selecting seeds with uniform size improves consistent planting depth. Uniform emergence leads to even crop development and better nutrient utilization. Mixed or broken seeds may produce weak seedlings.
Proper storage of seeds before planting is equally important. Seeds should be kept in dry, cool conditions to maintain viability. Good seed selection ensures strong early growth and uniform field establishment.
5️⃣ Seed Treatment
Seed treatment protects wheat from early-stage diseases and pests. Before sowing, seeds are coated with fungicides to prevent smut, seed rot, and other fungal infections. This treatment ensures healthy seedling development.
In addition to fungicides, insecticidal treatments may be applied to protect against soil pests. These pests can damage seeds before germination, leading to poor plant stands. Early protection gives seedlings a competitive advantage.
Biological seed treatments are also becoming popular. Beneficial microorganisms improve root development and enhance nutrient uptake. These treatments reduce chemical dependency while improving plant health.
Proper seed treatment reduces crop losses and improves uniform germination. It acts as insurance against early crop failure and ensures strong initial establishment.
6️⃣ Sowing (Planting)
Proper sowing ensures uniform crop growth and optimal plant population. Wheat seeds should be planted at a depth of 2–5 cm depending on soil moisture and texture. Planting too deep delays emergence, while shallow planting exposes seeds to birds and drought.
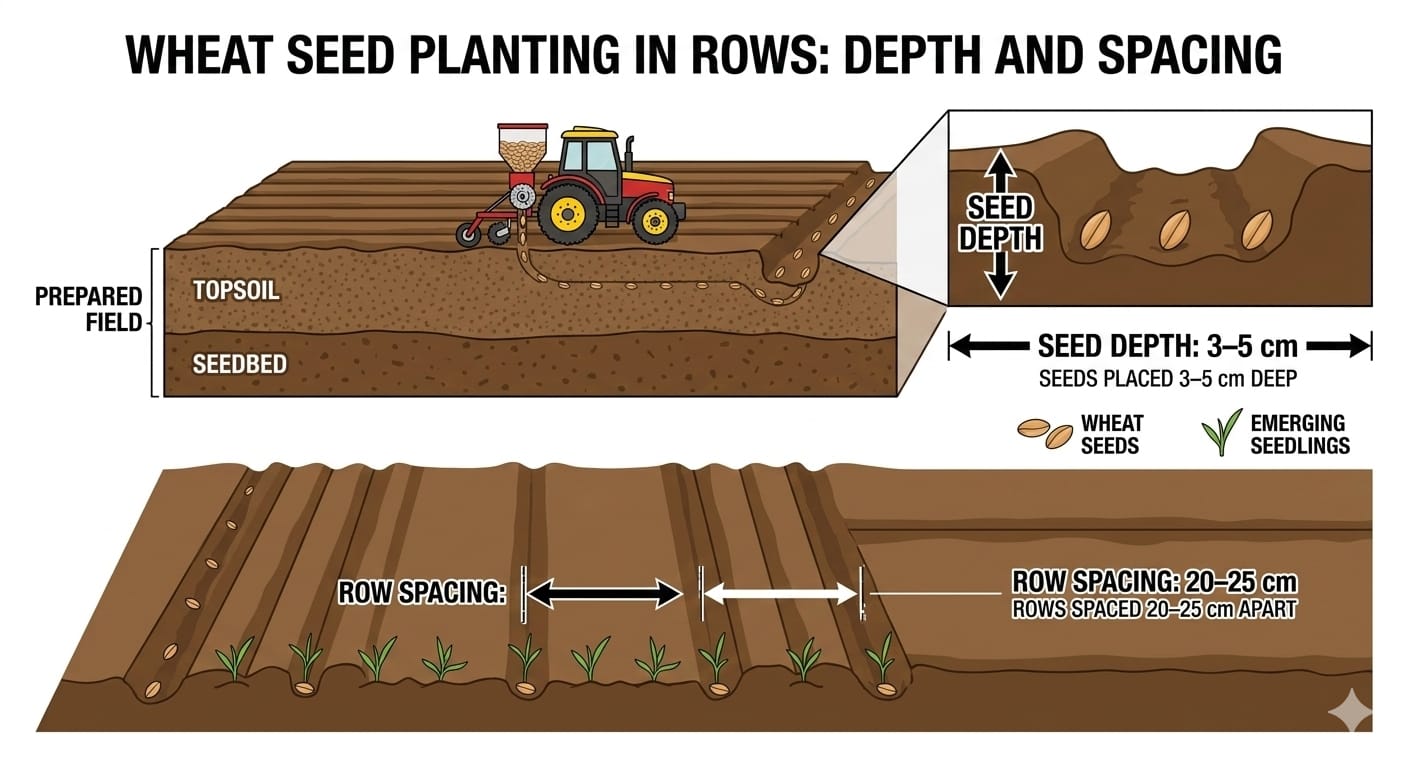
Row spacing of 15–25 cm allows adequate sunlight penetration and airflow. Proper spacing reduces competition for nutrients and moisture. Uniform plant distribution maximizes yield potential.
Using a seed drill is highly recommended for precision planting. It ensures consistent depth and spacing compared to broadcasting. Precision planting improves crop uniformity and reduces seed wastage.
Timing of sowing is critical. Delayed planting may expose crops to heat stress during flowering. Early planting ensures optimal use of seasonal rainfall and favorable temperature conditions.
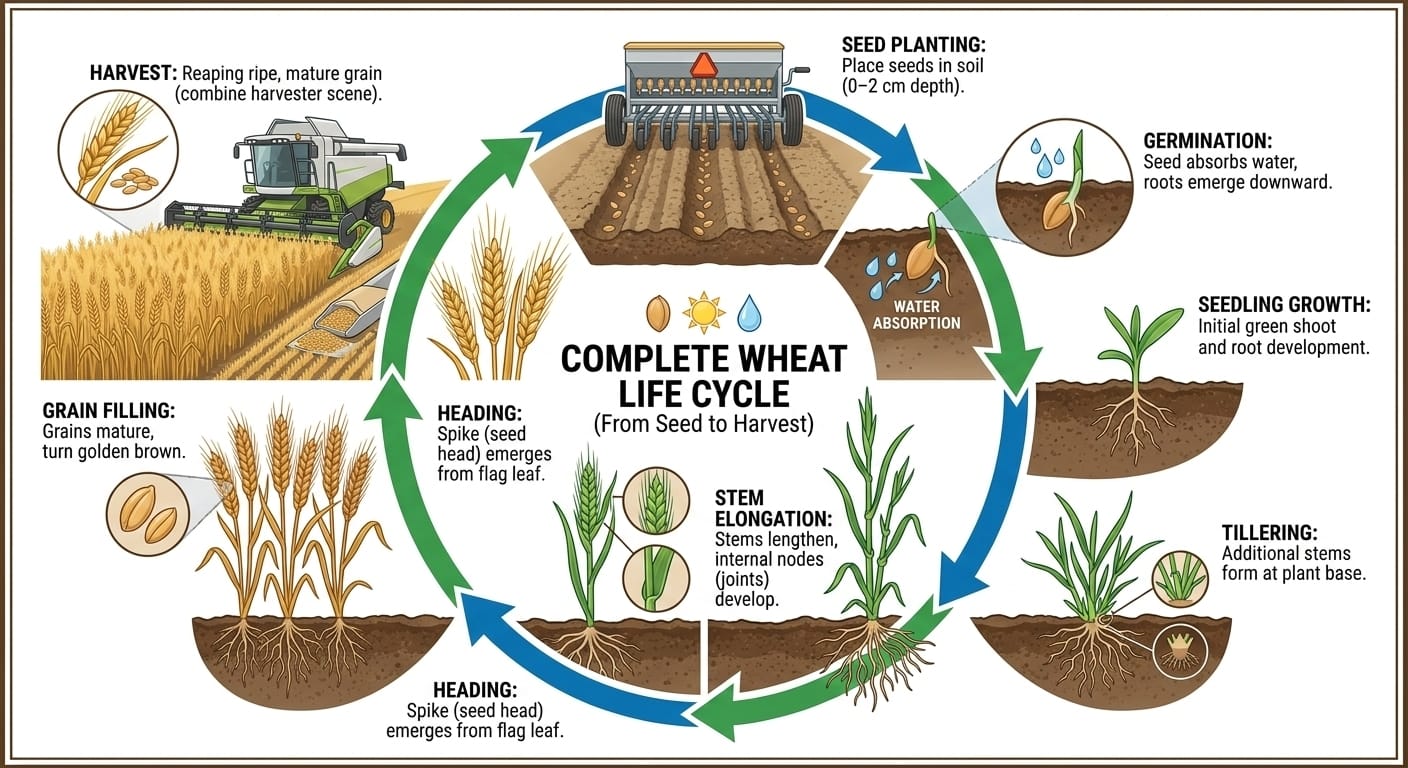
III Growth Stages of Wheat
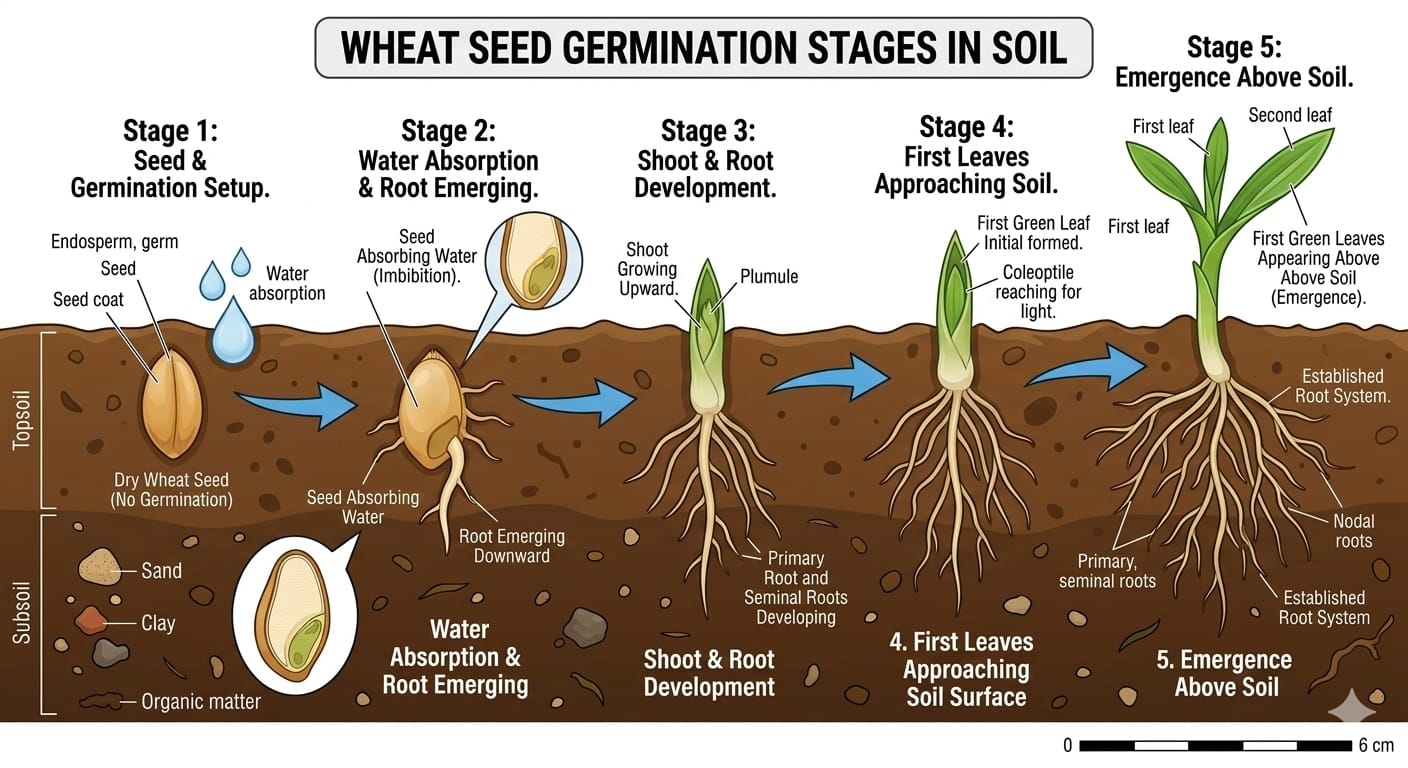
7️⃣ Germination and Early Growth
Germination begins when seeds absorb moisture from the soil. The seed coat softens, allowing the root (radicle) to emerge first. Shortly after, the shoot pushes upward toward the soil surface.
Adequate soil moisture is essential during this stage. Dry soil may delay or prevent germination. Proper seed-to-soil contact ensures efficient water absorption.
During early growth, the plant establishes its root system. Strong roots allow better nutrient uptake and drought resistance. Weak early growth can permanently reduce yield potential.
Uniform germination ensures even crop development. This stage determines final plant population, which is a key factor in yield.
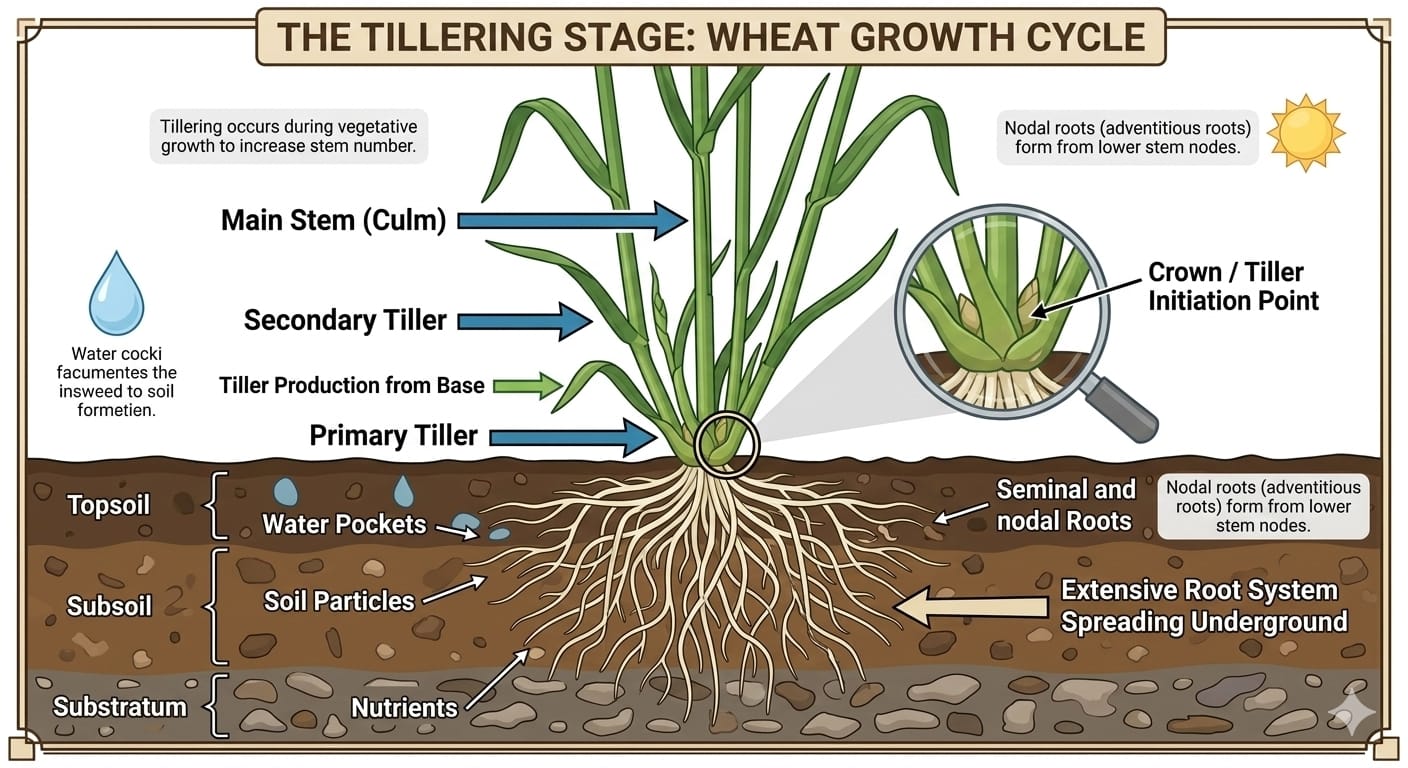
8️⃣ Tillering Stage
Tillering is the process where the plant produces side shoots from its base. Each tiller can potentially develop into a grain-bearing head. The number of productive tillers directly influences yield.
Nitrogen availability during tillering is critical. Adequate fertilization encourages healthy tiller formation. Deficiency may reduce the number of grain heads.
Environmental conditions also affect tillering. Cool temperatures and sufficient moisture promote better development. Stress during this stage reduces yield potential.
Proper management during tillering ensures strong plant architecture and maximum productivity.
9️⃣ Stem Elongation to Maturity
During stem elongation, the plant grows taller and prepares for reproduction. Nutrient demand increases significantly. Proper fertilization at this stage supports healthy development.
The booting stage follows, where the grain head develops inside the stem. This is a sensitive period requiring adequate moisture and nutrients.
Heading and flowering occur next. Pollination takes place during this stage, and heat stress can drastically reduce grain formation. Protecting crops from stress ensures better grain set.
Finally, during grain filling, starch accumulates in the kernels. Proper irrigation during this stage ensures full grain development. The crop reaches maturity when leaves dry and grains harden.
IV Crop Management Practices
🔟 Fertilizer and Irrigation Management
Wheat requires balanced fertilization. Nitrogen promotes leaf and tiller growth, phosphorus supports root development, and potassium enhances disease resistance.
Nitrogen is usually applied in split doses: at planting, during tillering, and at stem elongation. This prevents nutrient loss and improves efficiency.
Irrigation is critical at tillering, booting, and grain filling stages. Water stress during these stages reduces yield significantly.
Efficient water management prevents both drought stress and waterlogging, ensuring optimal growth conditions.
| Critical Stage | Management Focus | Impact on Yield |
|---|---|---|
| Tillering | Nitrogen top-dress + irrigation | Determines number of productive tillers |
| Booting & Heading | Moisture & disease protection | Ensures proper head formation and pollination |
| Grain Filling | Steady moisture, no stress | Maximizes grain size and test weight |
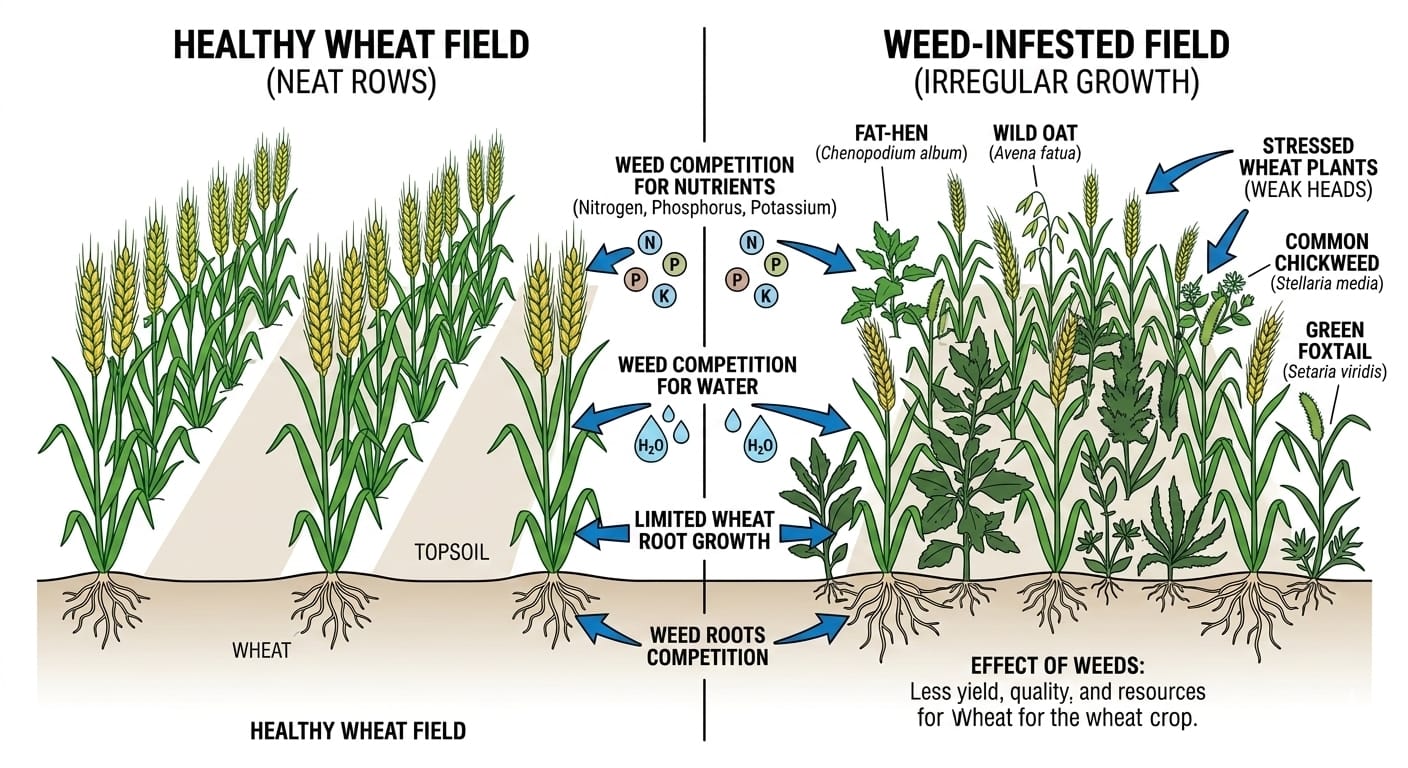
1️⃣1️⃣ Weed, Pest, and Disease Control
Weeds compete for nutrients, sunlight, and water. Early weed control during the first month is essential. Mechanical weeding or herbicides may be used.
Common pests include aphids and armyworms. Monitoring fields regularly helps detect infestations early. Integrated Pest Management (IPM) reduces reliance on chemicals.
Diseases such as rust and powdery mildew can cause serious yield losses. Using resistant varieties and timely fungicide application minimizes damage.
Preventive management is always more cost-effective than curative control.
V Harvest and Post-Harvest
1️⃣2️⃣ Harvesting, Drying, and Storage
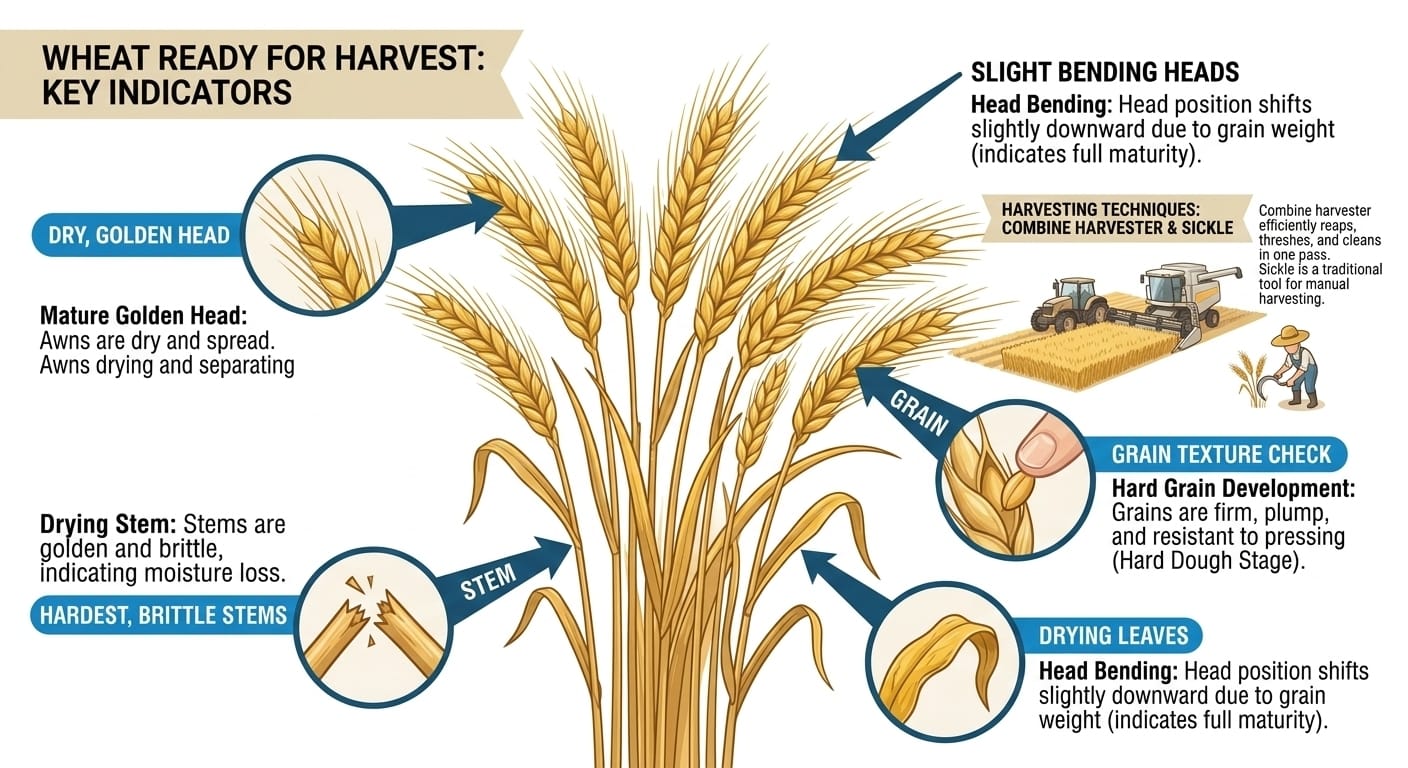
Wheat is harvested when grain moisture falls to about 18–20%. Delayed harvesting may cause shattering and losses. Combine harvesters are commonly used for efficiency.
After harvest, grains must be dried to 12–14% moisture to prevent mold growth. Proper drying ensures safe storage and maintains grain quality.
Cleaning and grading remove broken or damaged grains. High-quality grain fetches better market prices.
Storage in dry, ventilated conditions protects wheat from pests and spoilage. Proper post-harvest management ensures food security and profitability.